Thursday, September 27, 2012

DIY Painted Rug

After moving into our apartment the DIY projects began almost immediately. Obviously I had pinned over 100 different ideas that all claim they are $10 DIY "quick" projects and we both quickly learned that most projects are at least double the cost and usually a few hours longer than expected. In all reality the projects that we've done so far have all been relatively painless and turned out pretty great! The first thing we did was find a rug for the living room.

Our apartment is obviously small...but we wanted to put a rug in the living room to separate the space. We had also just gotten a book shelf and coffee table that were pretty dark, so we also wanted the rug to lighten up the room. I had seen on a few blogs and pins the idea of a painted rug and decided to try it.

We went to IKEA and bought the ERSLEV rug, it comes in two sizes and is a plain white flat-woven rug.  I definitely recommend this rug, it is easy to paint, light weight - yet stays put on the floor, and also reversible in case you mess up. I bought the 5'11 x 8' 2 rug and it is a really great size for our apartment.

So, first order of business after purchasing the rug. Invite my mom over.  The conversation went like this:

Me: "Hey Mom, what are you up to after church today?"
Mom: "Oh not much, you know the ravens are on at 1:00pm so we will probably be watching that at home and making some lunch."
Me: "Great, well how about you guys just come over and you can see the new chair we got and watch the game with us."
Mom: "Ok that sounds like a great idea, we'll head over right after service."
Me: "Cool, I'll just order some pizzas and what not."
Mom: "Ok love you!"
Me: "Love you too, mind bringing over some extra grey paint from one our bedrooms and maybe some painter's tape and maybe a brush and some sheets to cover the floor with? Great, see you tomorrow."
Mom: ...Ok.

So, at 1:00pm we were in the apartment watching the Raven's. Ok, well Andrew,  my dad and my sister were watching the Ravens and my mom and I were taping stripes on the rug to be painted right in front of them.

Exhibit 1:

This is me, painting the rug while Andrew is watching the game. You can't see my Dad in this picture, but I am sitting directly in his line of sight as he is getting very feisty about the Ravens not using their time-outs and challenges appropriately. I just hummed quietly to myself. Also - side note: if you are painting stripes, you might want to consider what size your rear-end is because if you make the stripes as wide as you are it is much easier to sit in between and paint. I did not follow this rule, there are some pictures out there (that live in the cell phone of my Mom) of me in all kinds of weird straddling positions trying to get the paint on this rug! Keep in mind, it wasn't even half time or anything...we were nearing the beginning of the fourth quarter at this time...

So anyway, this project is actually crazy easy. We took painters tape and marked out stripes on the rug. My mom taught me that you need to make the center stripe first and work out from there. I didn't use any precise measure for the stripes, I just used a book I had laying around and thought looked like the appropriate width.  The taping takes the longest amount of time. Make sure the tape comes down over the edges and underneath the rug and spend a few minutes pressing the tape down into the rug.

Also important to consider, the width of the tape will be included in the white stripe, so make sure that when measuring and placing the tape that in order to make all of them the same size, every other stripe will look thinner because this is the white stripe with the tape included in its size.

After laying the tape down we used some old latex paint from my sister's room. It was flat, but I could imagine that a semi gloss or gloss paint would work fine. I painted two coats on the rug and could have painted more if the end of the Raven's game wasn't quickly approaching.  I also failed to mention that my house guests (my Dad and sister) and my husband were trapped on the couch and couldn't necessarily get up because the rug was taking up the entire floor. See below.

 
They look thrilled. I took this picture on my phone (hence the not so great quality) and sent it out to all of my friends...the text replies I got back were "wow...everyone looks THRILLED about your rug." But now you can see how much space my craft was taking up on Football Sunday.

Everyone loved how it turned out (although you cannot see that in the picture above.) It was such a quick room transformation. The rug from Ikea is pretty good quality, is thick enough to stay still on the floor and the paint doesn't feel weird under your feet when you walk on it. I was supposed to spray it with Scotch Guard Fabric Protector...but I went to Target and couldn't find it so I just didn't do it. It's been two weeks and it still looks great - ask me in a year, though. I recommend using the fabric protector, I will buy some when I see it and use it. (Following through is not one of my top 3 strengths I list when interviewing...)


Last comment, please do not judge the coffee table, that is one of the next Pinterest DIY crafts that we are going to attempt this weekend or next!!  It will be fabulous.


Friday, September 21, 2012

Rehearsal Dinner

The rehearsal dinner was held at a house in Westminster that Andrew found by searching online for a rental house in the area. It ended up being the only house for rent in the town...you'll understand if you ever visit the area.  The house was originally owned by a mother that passed away and her son's were hoping to keep the house in their family.  They hoped that by renting it out to vacationers to nearby Gettysburg they'd be able to financially keep the house. I was anxious at first to rent a house we had never seen, but after emailing I received a phone call back from the son who now owned the house. It was an Alaska area code and he explained that he now lives in Anchorage and was sorry that he was sorry he was calling so late and explained the time difference. Of course I knew the time difference and I thought it was so crazy that the one house in Westminster that worked for us was owned by another Alaskan (Andrew is from Anchorage....duhhh.)  Turns out that much of his whole family lives in Anchorage and they travel back and forth frequently.


When we first pulled up to the house to visit we were so pleasantly surprised. The pictures were beautiful, but we first had to travel down a .75 mile long driveway.  It was gravel and you could only go maybe 10-12 mph the entire time. Not to mention I had a nail in one of my tires and it kept losing air so I was a little worried...


Once you arrive at the end the house sits at the top of a hill surrounded by corn fields. The corn had just been harvested, so I was a little disappointed we didn't have that for the atmosphere but it was nice to be able to look out and see everything.  We held the rehearsal dinner on the back porch of the house and had our caterer from the wedding come out and also provide tables and chairs. The porch fit all five tables and was able to comfortably seat 40 people for a seated dinner.


The decor was all Andrew's idea and I loved it! We bought burlap and cut 1' wide strips to use as table runners.  The picture above doesn't show the floor length white linens because they hadn't been delivered yet. On top of the burlap were thin wood things? I don't know what to call them. Wood slivers...wood circles...wood slabs...anyway, they were from Michael's and we used coupons to buy all of them. He then used a wood burning kit to carve our initials and placed mason jars with candles on top. 

Andrew's dad ordered the generous favors for the guests.  They are ulu knives and are symbolic of Alaska.  The whole theme was "East meets West" since Andrew is from Alaska and I'm from Maryland! :) He used the same font we had on our wedding invitations "Scriptina." They came out  awesome!


Andrew's sister Erynne ordered a cake through a friend that was half covered in an Alaskan theme and the other half Maryland. 


We found out later that there was also a table set up at the rehearsal dinner covered in postcards of places that meant something to us like Alaska, Maryland and New York.  People could write a note or wedding advice and a post card would be mailed to us once a week! We got the first one yesterday, I'll have to think of something creative to do with all of the postcards. 


Everything about the rehearsal dinner was great, the food, the venue, the decor, the company! We really had a great time :)


Getting Ready!

The night after the rehearsal dinner most of the bridal party stayed the night at the house we rented. This worked out well because the next morning the hairstylist and makeup artist were coming to the house EARRRLLLYYY in the morning to start on everyone.  Knowing that the morning was going to come quick and we needed all of the sleep we could get we decided to go to bed at 1:30am. That is, after we found a baby tarantula!
Don't worry, Carrie went to tarantula wrangling school back where she is from in Connecticut and knew how to hypnotize this little beast. She grabbed him by his back leg and threw him out the back door, kind of.


Moving right along...everyone brought their robes and dresses and shoes and there was a curtain rod in my room that we were able to hang them all up on. This was the first time we all got to see all of the dresses lined up next to each other and we arranged them in order of how the girls were walking down the aisle. The colors were perfect! They also all brought their hangers we ordered from Whiskey & Wedding Bells.


The next morning the hair stylist and makeup artist arrived at 7:45 am to start at 8. The makeup artist was from Clinique at the Nordstrom's in Columbia mall and she was really great. I'd be happy to pass her contact information on if anyone would like it.


While we were all getting our hair/makeup done and eating the humungous spread of breakfast muffins, danishes and croissants my bridesmaids gave me a scrapbook they had each made a page in. I love to scrapbook and looking at all the time and details they put into each page was so nice! Each page was 100% a reflection of each person and they were all totally different.


Some of my favorite pieces of advice came from Chelsea, one of the two married bridesmaids: 


Of course I could have included many more details in this post about the conversations with the hair stylist about placentas,  how much Alex loved her hairdo and Carrie bursting into tears due to sheer joy :* but that will all remain locked away. :)

Thursday, September 20, 2012

Wedding Updates!

So, the wedding is over! I can't wait for the professional photos but I wanted to post some updates of how all of the DIY projects came out!
 

Before I show you some of the specific projects, here is one picture of how the venue came out. It started to storm that day around 2:00pm so we ended up having the ceremony inside. At first I was a little bit disappointed, but by the time I arrived I realized it was an absolutely perfect situation. We were all so glad it was inside because of how magical it looked in there, it was a comfortable temperature, and it was the perfect amount of space.


The flower wall was the highlight of the entire venue. I loved how it looked up against the barn walls, and it fit perfectly behind our head table as a backdrop. To take it to the venue we (OK, mostly my parents...) put all of the flowers in produce boxes we picked up from Costco.  They were all packed into the UHaul truck and then replaced on the metal boards once everything arrived.


The fork namecards and garden trellis came out like this:


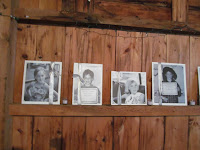
The edge of the barn was covered in pictures of Andrew and I as kids. One side of the barn started with us as infants and ended up with our engagement picture. You can see them in the background in this first picture and then more close up in the next two.


Next is a picture of the table settings, we had spray painted picture frames and painted the glass inside with chalkboard paint.  Of course there were also paper flowers glued on.  Also at the table were three vases all collected from thrift stores, one small, medium and tall. Inside each were a different white flower: hydrangea, roses and calla lilies. You can see them in the top picture, and there will be more pictures soon!


The next post will have more details about the photo booth, dessert table, cake pops and bridesmaid dresses/gifts!